One of the first decisions that I had to make was how to deal with colour. My wood engravings are monochrome; I do not make multi-block coloured engravings and seldom really like them, unlike Japanese style multi-block coloured woodcuts, which I love.
The bookplate which had interested the designers at Interabang was hand coloured with watercolour.
This is something I have done from time to time to make unique prints - I can trace my interest in doing this back to my love for the work of William Blake who hand coloured his illuminated books, often with very different treatments of the same images.
I decided to hand colour the stamp engravings. I kept records of the colour notes that I made in my sketchbooks as I went along:
The other decision that I had to make was how big to make the engravings. With my imaginary stamps, I always engraved them on small blocks to be printed directly from the wood. I decided to engraving the real stamp designs three times larger that "life". This was a arbitrary decision but when I reduced the first proof to stamp size, I was happy with the level of detail.
1. Pollination
Because I was working larger than the final design, I could cut fairly freely; in fact I had to make sure that I didn't slip into my normal way of working and engrave tiny, detailed marks. The sunflower was roughly sketched onto the darkened endgrain block but I took more care with the spirals in the centre.
I cut a couple of bees flying away from the flower. One of these was later removed. You can see that I used a rectangular block, leaving an uncut area at the bottom. I had plans for this after I had finished the project.
Here is a proof from the finished block. I made several different coloured versions of each design to send to Interabang, giving them the final choice of which version would be used. I found them very easy to work with and enjoyed the collaborative aspects of this project, having absolute trust in their judgement.
2. The Waggle Dance
This was a fairly straightforward engraving. I made a careful drawing and as much time was spent clearing away wood as on engraving the details.
This engraving went smoothly. After proofing, I began to try out some colours. I subsequently thinned the lines of the engraving.
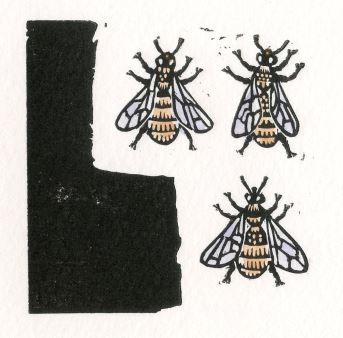
At the same time as engraving this block, I engraved some sets of extra bees in case they were needed. I called this "The Subs Bench" - here are some of them:
3. Making Honey
I enjoyed engraving this block very much and was very pleased with the results.
Unfortunately, this design wasn't approved as it stood and so I made a new version based on the central portion. In order to keep the width of the engraved lines the same as the other images, I engraved this on a smaller scale - twice the final size.
4. Tending Young
I started each of my attempts at engraving this design with careful marking out of the honeycomb:
In my first attempt, I fell back into old familiar ways, engraving with too much detail, giving a very muddy result when the image was reduced:
The second attempt reduced well but the bees were too well contained within the image:
The final version had more of a bee breaking out of the shape of the honeycomb. We were all happy with this one:
Again, I made several different colourings of the engraving.
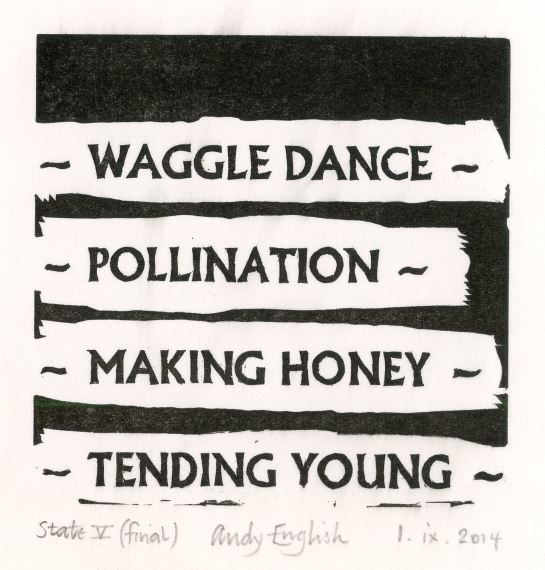
The next part of the project was to engrave the lettering for the titles of the sheet and individual stamps. In reading about my work, Interabang had learned of my love for the typeface "Albertus" and we based the hand-cut lettering on that.
Here is an early proof from the block:
There was room at the top of the block to engrave the overall title, substituting a hexagonal cell for the letter O:
The last engraving to be done was the border, which I did in two parts:
Now it was up to Adam and Ian at Interabang to put all of the elements together and make a sheet of stamps!
I had to wait from June until the following August to see the finished stamps, which were issued on the 18th:
Here is the presentation pack:
I also treated myself to four different First Day Covers:
I was particularly pleased to find that one of the Royal Mail covers was franked with a quotation by William Blake. Once again, invisible threads link different aspects of my work.
I was very proud to go along to the post office and buy some:
Postscript
This project started with a bookplate and it ends with one.
The Pollination block had an area of uncut wood below the image of the sunflower. I used this to cut my name - using the same Albertus style of lettering - and a few more bees:
There was just a little too much space between the lettering and the flower so I removed a slice of wood before printing - and hand colouring it:
It was quite a journey. I am still thrilled to have done this. We must preserve our honey bees!